In the realm of deep‑foundation construction and rotary piling operations, the Kelly bar (also commonly referred to as a drilling rod, telescopic kelly bar or interlocking / friction kelly bar) occupies a central and critical role. At JMach Global we specialise in providing high‑quality drilling rig components and accessories that cater to rigorous job‑site conditions. This article dives into the major components of the Kelly bar, explores correct usage practices and details how to protect and maintain this key element to maximise service life and minimise downtime.
The Role of the Kelly Bar in Rotary Drilling
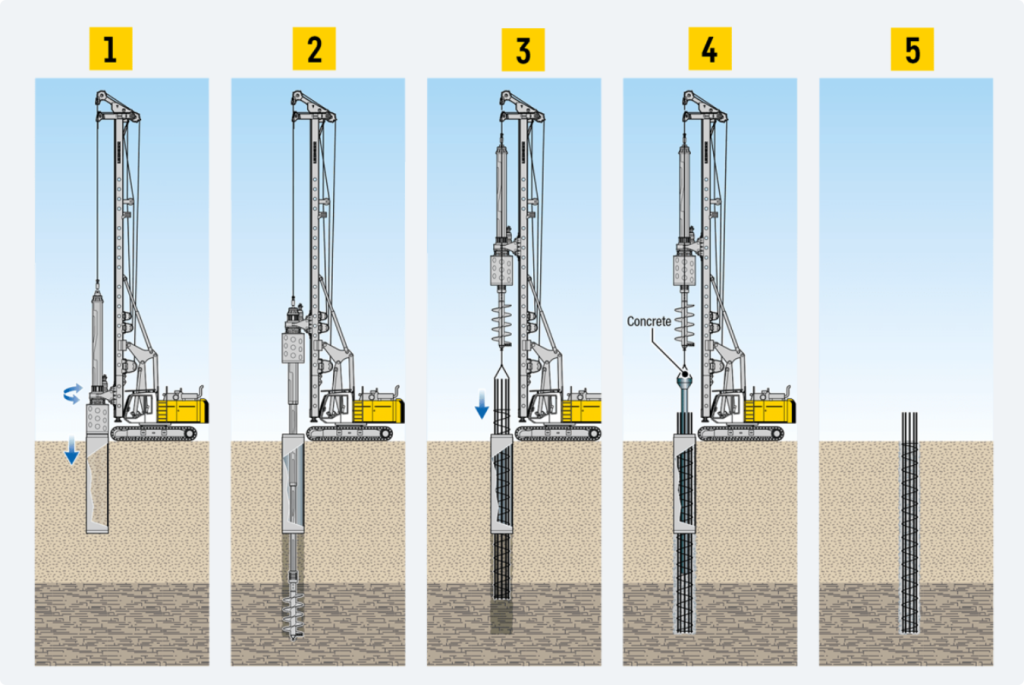
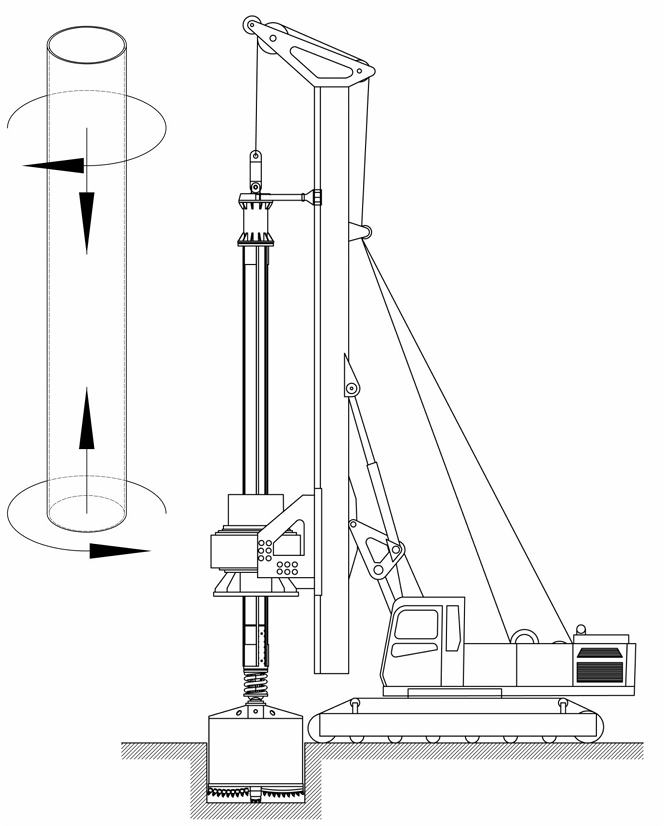
One of the most common dry rotary drilling methods for bored pile construction is kelly drilling. The Kelly bar acts as the interface transmitting both torque from the rotary drive and crowd pressure (vertical force) from the hoisting system to the drilling tool or bit. In simpler terms: while the drilling rig’s rotary head supplies the twist, and the mast/crowd system delivers the push or pull, the Kelly bar bridges those forces down to the pile‑drilling tool. Thus, it is a backbone of your piling rig system.
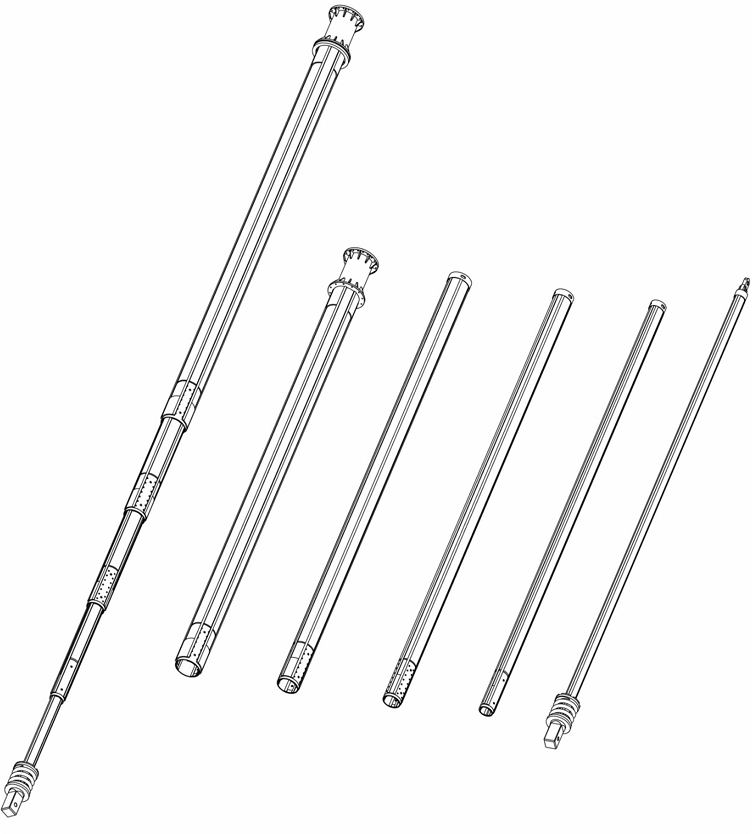
The Kelly bar typically consists of telescopic or nested steel tubular sections, drive keys (or ribs), lock recesses and a swivel or head assembly connecting to the drill string. Depending on the rig type and ground conditions, you may encounter interlocking Kelly bars (which have mechanical locking between stages) or friction Kelly bars (which rely on friction driving and are simpler, lighter for softer soils).
Because of its essential role, any fault or wear in the Kelly bar components can lead to reduced efficiency, unexpected downtime or even safety hazards — in other words: it is worth protecting.
Key Components of a Kelly Bar and Why They Matter
Below are major parts of the Kelly bar and how each contributes to performance:
Telescopic Tubular Sections: These nested steel tubes provide the extended length required for deep piles while keeping transport length manageable. They must be robust enough for high torque and vertical load.
Drive Keys / Ribs / Strips: These are protrusions welded to the outer surface of the tubes that lock into matching recesses in the guide frame or Kelly guide, enabling torque transmission. Wear or damage here reduces torque transfer efficiency.
Lock Recesses / Shells / Push‑up & Pull‑up Shells: In interlocking types, mechanical shells and locking recesses secure the telescopic segments in position during drilling. These ensure stability, especially in hard rock formations.
Swivel Head / Kelly Head / End Terminals: The connection point between the drilling rig’s drive mechanism and the Kelly bar. It must be aligned and properly maintained to avoid misalignment or vibration.
Damping Springs & Shock‑Absorbing Plates: Many modern Kelly bars include shock‑absorbing devices to mitigate vibration and sudden loads, especially in rock or mixed ground.
Kelly Guide / Guide Frame / Kelly Bar Spare Parts: The guide frame through which the Kelly bar slides is itself part of the system; wear here affects smooth operation and alignment.
By understanding these components, operators and maintenance teams can better monitor wear, identify weak points and perform targeted maintenance rather than broad guesswork.
Best Practices for Use: From Mobilisation to Operation
Pre‑Installation Inspection – Before deploying the Kelly bar on site, check for any shipping damage, weld quality, correct fit of telescopic sections, and ensure the drive keys are intact.
Selection Based on Ground Condition – For soft soils or where speed is key, a friction Kelly bar may suffice; for hard rock strata or deeper piles, an interlocking type will offer better structural stability.
Proper Rig Setup – The drilling rig mast, rotary head and Kelly guide must be aligned vertically and anchored correctly to prevent eccentric loads on the Kelly bar.
Gradual Torque & Crowd Application – Avoid sudden surges of torque or vertical force; ramp up as the drilling progresses to reduce stress on the key components.
Monitor for Unusual Vibration or Misalignment – Any unusual behavior (vibration, wobble, unusual sound) often indicates wear in the Kelly bar or guide system; stop and inspect quickly.
Transport & Storage Considerations – Keep the Kelly bar clean, free from abrasive dust or debris, store horizontally supported, and protect from corrosion if stored for longer periods.
Maintenance & Protection: Extending the Life of Your Kelly Bar
Regular maintenance is non‑negotiable if you want your Kelly bar to serve reliably over many jobs. At JMach Global, part of our service is to advise clients on standard inspection and care routines. Below are some of the key strategies:
Daily and Weekly Checks
Clean the outer surfaces of the Kelly bar and remove any mud, slurry, or abrasive residue — buildup accelerates abrasion of drive keys and tubular sections.
Inspect the drive keys and ribs for signs of wear, distortion or cracking.
Check the telescopic sections for smooth sliding, ensure there’s no binding or abnormal friction.
Confirm the swivel head and end terminals are secure and free of play.
Lubricate sliding surfaces and guide interfaces as per manufacturer’s recommendations.
Scheduled Inspections & Professional Service
Manufacturers and industry sources recommend more detailed inspection every 400–600 operating hours for interlocking balls, and up to 800–1000 hours for friction types, depending on soil/rock conditions and load. At these intervals you should:
Disassemble and examine key joints, shells and lock mechanisms for fatigue cracks or elongation.
Measure wear of ribs, keys, and guide frames against manufacturer tolerances.
Check protective coatings, anti‑corrosion layers and repaint if needed.
Replace worn parts (keys, shells, springs) proactively rather than waiting for failure.
Protection Strategies on Site
Use protective covers or caps during movement between sites to prevent damage from transport or handling.
In corrosive or saline environments, apply anti‑corrosion coatings or rust inhibitors to the Kelly bar and its guide frame.
Monitor machine alignment – misalignment in the rotary head or mast causes off‑axis loading, accelerating wear and fatigue.
Educate operators: correct handling, avoiding dragging the Kelly bar, ensuring the guide frame is clean and aligned before insertion.
Common Wear & Failure Modes – What to Look For
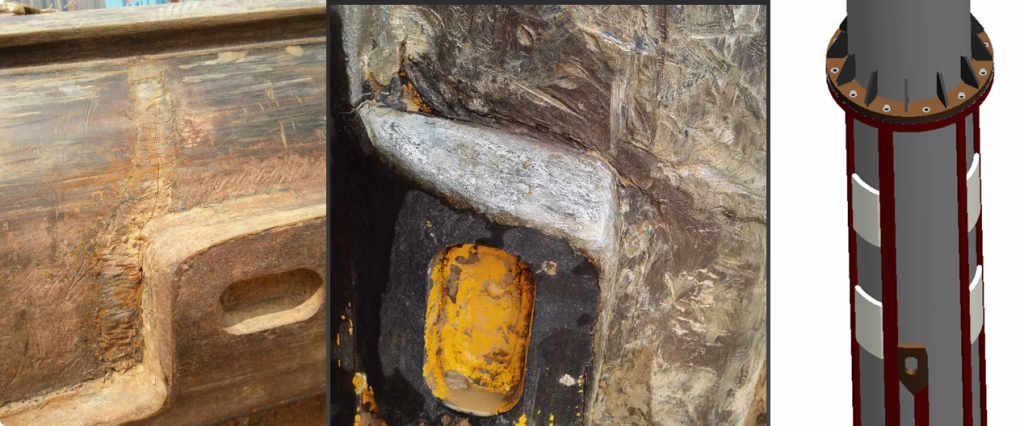
Key or Rib Shearing / Flattening: This reduces effective torque transfer and can lead to slippage under load.
Telescopic Section Binding or Deformation: Caused by side load or misalignment; this can destroy cylinders and bearings.
Swivel Head Looseness or Damage: Causes vibration/leverage loads and can transfer stress back into the Kelly bar.
Surface Corrosion & Abrasion: Especially where slurry, grout or rock cuttings are present; protective coating deterioration worsens this.
Fatigue Cracks in Lock Recesses or Shells: Often hidden; regular inspection essential.
Identifying these signs early allows for component‑level maintenance rather than full replacement, saving time and cost.
Why Choosing the Right Partner & Product Matters
In a competitive market you will find various providers of Kelly bars and drilling rig spare parts. For example, many platforms list “Rotary Drilling Kelly Bar”, “Interlocking Kelly Bar”, “Drilling Rig Kelly Bar”, as well as other keywords like “Kelly bar tool”, “Kelly guide for rotary drilling rig”, etc. At JMach Global, we emphasise:
Material Quality: High‑alloy steel, heat‑treated, properly welded and tested.
Fit for Application: Matching machine model (e.g., for rigs from BAUER, SOILMEC, SANY), drilling depth and ground condition.
Spare Parts & Support: Supplying drive keys, ribs/strips, locking shells, springs, end terminals and offering field technical support.
Documentation & Training: Guidance on installation, maintenance schedule and correct usage.
Choosing a sub‑par Kelly bar may save upfront cost but can increase downtime, maintenance cost and risk of failure.
Practical Case Study: Maximising Efficiency in Piling Projects
Consider a piling contractor faced with a mixed ground condition: the upper layer composed of soft soil followed by a medium hard rock layer at 30 m. The team installed an interlocking Kelly bar rated for 40 m depth, paired with an appropriate drilling rig. They adhered to the daily and week‑based maintenance checks, and scheduled a major inspection after approximately 500 operating hours. The result: consistent drilling speed, minimal tool downtime and predictable maintenance intervals.
Conversely, if they had used a lower‑grade friction Kelly bar without adequate inspection, the drive keys could have begun to shear under rock loads, resulting in a costly shutdown to replace the Kelly bar sections mid‑job.
Summary: Protecting Your Investment in Kelly Bar Components
A Kelly bar is not a consumable but a strategic asset for your rotary drilling operations — treat it accordingly.
Understanding its component parts (drive keys, telescopic sections, guide frames, swivel head) helps you monitor wear and act proactively.
Regular use of cleaning, lubrication, inspection and protective coatings pays dividends in uptime and durability.
Partnering with a reliable supplier/technical team ensures you get the correct specification, spare parts and service support.
At JMach Global, we stand ready to assist with your Kelly bar supply, maintenance advice, and customised solutions to match your rig model, site conditions and operational ambitions.
For further information, detailed specifications or to discuss the correct Kelly bar for your drilling rig model, please contact our team — we’re eager to support you in achieving high‑efficiency, low‑downtime piling projects.